Home
Members Message Board
Instructions for Message Board Registration
Newsletter
Join Crossroads Anglers
Fly Catalog
Photos
Officers
Fishing Reports, Tides, Temperature
Lake Depth Maps
Stocking Schedule
Western Mass. Daily Hatches
Flytying Patterns, Tying Techniques, Information on Flies & Insects
Bear's Den
Saltwater Edge

Founded 1994 by Armand Courchaine
Dick Pearce's 3 Midges
A. K. Best’s Black Magic Midge Larva - Best's Black Midge Emerger Cream Soft Hackle - Paul DiNola's Quill Body Chironomid Pupa
If you find the idea of tying tiny flies intimidating, start with A. K. Best's Black Magic Midge larva--in size #20. Everyone at the table agreed that it was easy and a good way to start.
![]()
A. K. Best’s Black Magic Midge Larva
Hook: Dry fly, #14 through 22. (Use an up-eye or ring-eye hook for #18 and smaller.)
Thread: Black 6/0 or 8/0.
Body: Black rooster quill for #14 and 16. Black Moose Mane for #18 and 20. Black thread for #22 and smaller. Allow quills and mane hairs to soak in water for 20 minutes before tying.
Thorax: One or two turns of loose black dubbing or
two turns of peacock or fine black ostrich.
- Attach the tying thread two hook-eye spaces behind the eye and wrap toward the bend with closely nested turns.
- For #22 and smaller hooks, bring the thread forward to within two hook-eye spaces of the eye.
- Either dub one or two tiny turns for the tho-rax or attach a fine-fibered black ostrich tip and take one or two turns.
- Whip-finish, apply a tiny drop of head lacquer to the head, and stroke
another drop of head lacquer to the thread body.
- For #20 – 18: After step 2, select 2 long, dark moose mane
hairs, clip of 1 inch of tips, and wrap hairs down to bend. Then carefully
wrap the hairs in tight-nesting wraps to tie in point and contiue with
step 3 and 4 above.
For # 16 and larger substitute 2 black rooster neck hackle quills.
From Advanced Fly Tying, Lyons's Press, pp.94, 95
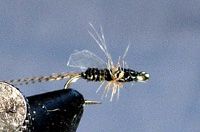
A.K. Best's Black Midge Emerger Cream Soft Hackle
Hook: Dry-fly hook, #16 through 22.
Thread: Black 8/0 for tail and abdomen, cream for tying
in hackle.
Tail: Five or six wood duck flank feather fibers or dyed
mallard, length to equal hook shank.
Body: One stripped and black-dyed rooster neck hackle
quill.
Wing: Segment of waffle-imprinted clear plastic strip.
Use Glad Lock bags the kind that says, "Yellow and Blue makes Green."
There is a waffle imprint on either side of the closure strip that makes
wonderful midge wings. Width should equal the hook-gap space.
Hackle: Two turns of light ginger or cream hen hackle.
- Attach the thread to the hook at midshank and wrap to the beginning of the hook bend.
- Select a wood duck or dyed mallard flank feather with stiff fibers and clip off only five or six fibers. Line them up on top of the hook with the tips extending beyond the hook bend by the length of one hook shank. Wrap the butts forward to within three hook-eye spaces of the hook eye, lift the butts, and trim them off. This will be the shoulder of the fly
- Select a stripped and black-dyed rooster neck hackle quill. Clip off the tip at a point where the remaining quill tip diameter will match the diameter of the hook, thread, and tailing butt.
- Lash the quill to the hook with the butt to the rear and the clipped tip even with the clipped tailing butts. Wrap the thread down to the hook bend, bring the thread forward to the shoulder, and wrap the quill forward in tightly nested wraps to the shoulder. Tie down the butt with several turns of tight thread, lift the butt, and clip it off. Smooth the butt with several turns of thread.
- Cut a strip of waffle plastic as wide as the hook gap. Clip one end to an arrow shape and tie in the point of the arrow parallel to the hook shank on top of the shoulder, and slightly to the tyer's side of the hook. Thread torque will slide it to the top of the hook. Be certain that the arrow point is tied in on top of the shoulder, not in front. This will keep the wing lying flat against the top of the quill body.
- Use your right-hand thumb and forefinger to fold a crease in the wing parallel to the hook shank. Clip the butt of the wing even with the end of the bend and trim off the corners of the wing butt. [More realistic wings can be made by using the folded end of the baggie strip (or making a fold), holding the two strips together, cutting a narrow triangle, and then cutting on the fold. Then, still holding the strips together, tie the narrow ends to the hook shank as described above. Spread the wide ends slighly so they barely hang over the body, and trim them even with the bend (see picture above)].
- Select one light ginger or cream hen hackle from near the tip of the neck. The hackle fiber length should be one and a half times the hook gap
- Change to cream thread. Strip away all the marabou fibers from the base of the feather, and tie the butt of the hackle shinyside down onto the hook immediately in front of the shoulder of the body.
- Attach your hackle pliers to the tip of the hackle and take only two turns of hackle toward the hook eye. Tie off the tip, clip the excess, and whip-finish.
- [If you're not using soft hackle, clip the hackle from the bottom of the fly and] add a tiny drop of head lacquer.
From Advanced Fly Tying, Lyons's Press, pp. 124-127
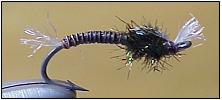
Paul DiNola's Quill Body Chironomid Pupa
See UFTRI's Fly Catalog. Search aphabetical Fly Pattern Archive.
Home - Members Message Board
- Instructions for Message Board Registration -
- Newsletter - Join Crossroads Anglers - Fly Catalog - Photos - Officers
Fishing Reports, Tides, Temperature - Lake Depth Maps - Stocking Schedule - Knots -
Western Mass. Daily Hatches
Flytying Patterns, Tying Techniques, Information on Flies & Insects - Fishing Techniques -
Online Magazines - Bear's Den